Use this controller deadzone tester to check how your analog sticks behave around the center, spot unwanted movement, and find a deadzone that keeps your aim steady without making the sticks feel sluggish.
Connect your gamepad by USB or Bluetooth, press a button so the browser detects it, then leave both sticks alone for a few seconds. After that, move each stick through its full range and let it snap back to center.
The tester reads the analog axis values your browser receives through the Gamepad API. Those axis values are normally reported on a scale from -1 to 1, with values near 0 representing the center position.
Controller Deadzone Tester
Test Your Controller Deadzone Online
Start with both sticks untouched.
Watch the left and right stick markers. A healthy stick does not have to sit at a mathematically perfect 0.000 every second. Small changes can come from the stick mechanism, controller calibration, firmware, drivers, or how the browser maps the device.
What matters is whether the input stays close to center and remains stable enough for the deadzone you want to use.
Next, slowly roll each analog stick around the full edge. This lets you check the range, direction, center return, and any spots where movement looks uneven.
The browser may also report whether your gamepad uses the standard controller mapping. The Gamepad API allows browsers to remap recognized controllers to a common layout, while unknown devices may expose a different raw layout.
How to Use the Controller Deadzone Tester
Connect Your Controller
Plug the gamepad into your computer with USB or pair it through Bluetooth.
Press any controller button if it does not appear right away. Some browsers wait for user input before exposing a connected gamepad to a webpage. Firefox, for example, requires interaction before a controller becomes visible to the page.
Leave Both Sticks Untouched
Take your thumbs off both analog sticks for a few seconds.
The goal is to see where each stick rests when you are doing nothing. Watch for center offset, small jitter, or steady movement in one direction.
Move Each Stick in a Full Circle
Push the stick gently to the outer edge and rotate it around the gate.
Do this slowly. You are checking whether the stick reaches a similar range in every direction and whether the movement looks smooth.
Release the Stick
Let it return to center by itself.
Do this several times from different directions. A stick that keeps settling in a different spot may have a centering or calibration issue even if one single reading looks fine.
Adjust the Deadzone and Retest
Start low and increase the setting only enough to stop unwanted idle input.
Then test the controller inside the game you actually play. Browser readings and in game behavior are related, but they are not always identical because the game can apply its own deadzone, response curve, sensitivity, and input processing.
What Is a Controller Deadzone?
A deadzone is the area around the center of an analog stick where small movements are ignored.
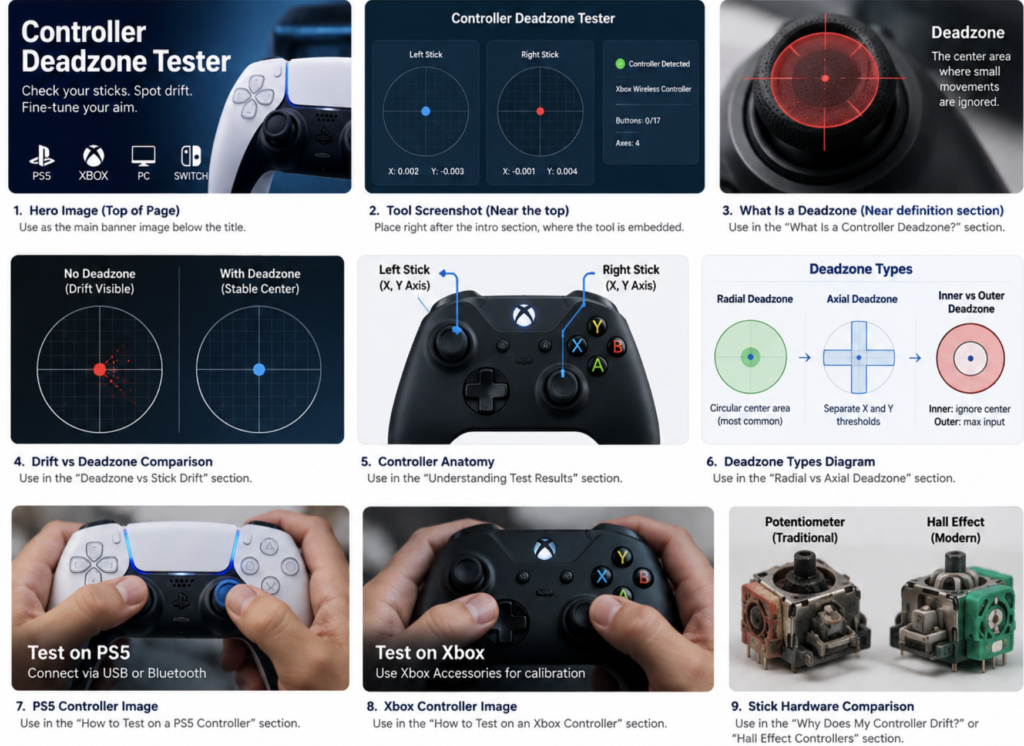
If your stick moves slightly inside that area, the game treats the input as zero.
This helps stop tiny sensor changes or minor drift from moving your character or camera. The tradeoff is simple: making the deadzone larger can hide unwanted movement, but it also means you must push the stick farther before the game reacts.
Steam’s own controller documentation describes a deadzone as a central radius where analog input is ignored.
For shooters, that difference is easy to feel. A small deadzone can make fine aim adjustments react sooner. A large one can make the first part of stick movement feel numb or slow.
What Is a Good Deadzone Percentage?
There is no single percentage that is right for every controller and every game.
The useful setting is usually the lowest value that keeps the stick stable during normal play.
A controller that rests very close to center may work with a small setting. A worn stick may need more room before unwanted movement disappears.
The game matters too. Steam notes that games can apply their own deadzones to controller output, which is why the same gamepad can feel sharp in one title and mushy in another.
Instead of chasing a number someone posted on Reddit or YouTube, measure your own stick first.
If your resting input stays below a certain point, set the game slightly above that level and play for a few minutes. If the camera still creeps or the character moves by itself, raise it a little and test again.
Is 0% Deadzone Actually Better?
Not automatically.
A zero setting gives the game access to very small stick movements, which can make controls feel more immediate. It also leaves no center buffer to hide tiny unwanted inputs.
If your controller stays stable at zero and the game handles the signal well, you may like the response.
If the stick has slight center noise, zero can make your aim creep even when your thumb is off the stick.
This is why experienced players often tune the setting around their own controller instead of copying one fixed number.
Deadzone vs Stick Drift: What’s the Difference?
Deadzone and stick drift are connected, but they are not the same thing.
Deadzone is an input setting. It tells software how much movement around the center to ignore.
Stick drift is unwanted analog input when you are not intentionally moving the stick.
For example, imagine your right stick rests slightly to the right instead of returning to center. Your game may slowly move the camera.
Adding a small deadzone can hide that input from the game. It does not repair the part that caused the stick to move away from center.
This distinction matters because raising the setting can make a drifting controller usable for longer, but the underlying problem may still remain.
How Do I Know If My Controller Has Stick Drift?
Leave the controller on a flat surface and keep your hands off the analog sticks.
Watch the tester.
If the stick position keeps moving away from center without any input from you, repeat the test several times. Then try the same controller in another game.
Common signs include a camera that slowly turns, a character that walks without input, aim that pulls in one direction, or menus that move on their own.
One odd reading is not enough to condemn the controller. Look for repeated behavior.
Can Increasing Deadzone Fix Stick Drift?
It can hide minor drift, but it does not repair worn hardware.
A larger center buffer tells the game to ignore more unwanted stick movement. That can stop a slow camera creep if the drift is small.
As the problem gets worse, you may need a larger setting. At some point, the loss of fine control becomes noticeable.
Xbox makes the same distinction with its own thumbstick calibration feature. Microsoft says recalibration can help with minor inconsistent responses, but some drift caused by normal wear cannot be fixed through calibration.
How Do I Find the Lowest Deadzone Without Stick Drift?
Start at a low setting.
Leave the stick untouched and watch its resting movement for several seconds. Repeat the test after moving the stick left, right, up, and down.
Once you know the highest input the stick reaches while resting, set your in game value slightly above that point.
Then play.
Try slow camera movement, fine aiming, menu navigation, and quick flicks. If the view creeps when you release the stick, raise the setting a little. If the controls feel slow around center and there is no drift, try lowering it.
The number that works during actual gameplay matters more than a pretty 0.000 reading on a tester.
Radial Deadzone vs Axial Deadzone
Radial Deadzone
A radial deadzone measures how far the stick is from the center using both the X and Y axes together.
A common way to calculate that distance is:
magnitude = √(X² + Y²)
This creates a circular center area.
If the stick stays inside the chosen radius, the input can be treated as zero.
Radial handling often feels natural for aiming because diagonal and straight movement are judged by distance from the same center point.
Axial or Per Axis Deadzone
An axial deadzone checks X and Y separately.
Small horizontal movement can be ignored independently from vertical movement.
This can be useful for certain control schemes, but it may feel different around diagonal movement because each axis crosses its own threshold.
Which One Should You Use?
For regular dual stick aiming, radial behavior is common because it follows the stick’s distance from center.
Per axis handling can make sense when horizontal and vertical movement need separate treatment.
The better choice depends on the game and what its input system expects.
Inner Deadzone vs Outer Deadzone
Inner Deadzone
The inner deadzone is the ignored area around the neutral position.
Increasing it can hide small drift but reduces fine movement near center.
Outer Deadzone
The outer setting controls how close the stick must get to its physical edge before the game treats it as full input.
This matters in games where the stick does not reach maximum output evenly in every direction.
Anti Deadzone
Anti deadzone works in the opposite direction.
It increases the minimum output once the stick leaves the center area. Steam describes this as a way to compensate when a game’s own deadzone makes the control feel mushy.
Use it carefully. Removing too much of the center buffer can make even tiny stick movements produce visible input.
Understanding Your Deadzone Test Results
X Axis and Y Axis
Each analog stick normally reports horizontal and vertical movement.
The W3C Gamepad specification normalizes gamepad axes to values between -1 and 1. For a standard mapped controller, the first axis pair commonly represents the left stick and the next pair represents the right stick.
A value near zero means the axis is near its center.
Stick Magnitude
Magnitude combines horizontal and vertical movement into one distance from center.
This is useful when measuring a radial deadzone.
A stick can have small values on both axes while still sitting farther from center than either number suggests on its own.
Center Offset
Center offset is the distance between the reported resting position and the expected neutral point.
A small offset does not automatically mean the controller is faulty.
What matters is whether the offset causes unwanted movement in the software you use.
Neutral Jitter
Jitter is small input movement while the stick is untouched.
A stable stick may show tiny changes without producing a noticeable problem. Larger or inconsistent movement can make very low settings harder to use.
Maximum Resting Offset
This is the largest center movement seen while the stick is sitting idle during the sample.
It can be more useful than looking at a single frame because drift may change slightly over time.
Return to Center Error
Push the stick away from center and release it.
If it returns to roughly the same position each time, centering is consistent.
If every release lands somewhere different, calibration, wear, contamination, or the physical centering mechanism may be involved.
Circularity
Circularity checks how evenly the stick reports movement around its full range.
This is different from center drift.
A controller can sit perfectly still in the middle and still have an uneven outer range.
Stick Range
Range tells you how much movement the browser sees from center toward each outer direction.
A stick that cannot reach expected output may feel slow at full tilt even if its center looks fine.
Why Does My Controller Show Movement When I’m Not Touching It?
There are several possible causes.
Traditional potentiometer sticks measure position using moving electrical contacts. Over time, the contact surfaces can wear and the reported center value can shift. iFixit’s technical breakdown of common joystick modules explains how wear on the resistive surface can change the voltage reading and lead to drift.
Other causes can include calibration, contamination, spring wear, replacement stick tolerances, controller firmware, or software processing.
That is why testing should come before replacing parts.
Why Can a New Controller Still Show Deadzone or Drift?
New does not mean mathematically perfect.
Analog parts have manufacturing tolerances, and the controller may use factory calibration to translate physical movement into a usable digital range.
A replacement stick can also require calibration.
iFixit notes that new potentiometer modules can vary enough that controllers normally rely on calibration data to establish the expected center.
This is also why a tiny browser reading should not be treated as proof that a brand new controller is defective.
Test whether the movement is repeated and whether it affects games.
Do Hall Effect Controllers Have Deadzones?
They can.
Hall Effect describes how the stick position is sensed. It does not mean games stop using deadzones.
Traditional potentiometer sticks rely on sliding electrical contacts. Hall Effect designs measure a magnetic field without the same electrical contact surface, which removes one common source of sensor wear.
The rest of the controller still has physical parts. Springs, plastic mechanisms, calibration, firmware, and software processing can still affect the center position.
A Hall Effect controller can also use a deadzone in its own software or inside the game.
So “Hall Effect” and “zero deadzone” are not the same thing.
What About TMR Joysticks?
TMR sticks also use magnetic position sensing instead of a traditional sliding resistive contact.
They are another contactless sensing design now appearing in gaming controllers.
That can reduce wear at the sensing element, but it does not remove the need for mechanical centering, calibration, firmware, or game settings.
A magnetic sensor does not guarantee that every game should be played at zero.
How to Test Deadzone on a PS5 Controller
Connect your DualSense to a Windows PC with USB Type C or Bluetooth, then open the tester in a supported browser.
Sony officially supports DualSense connections to Windows PC through both Bluetooth and USB. Sony also notes that some controller features vary by device and game.
Once connected:
Press a button to wake the controller.
Leave both sticks untouched.
Check their center positions.
Roll both sticks through their full range.
Release them several times.
Then compare the browser result with the deadzone options inside the game you play.
If the controller behaves normally here but drifts only in one game, check that game’s input settings before assuming the hardware is bad.
How to Test Deadzone on an Xbox Controller
Connect your Xbox Wireless Controller to a PC and run the same center and range checks.
If the stick response seems inconsistent, Xbox provides a thumbstick recalibration tool through the Xbox Accessories app for supported controllers.
Microsoft says the tool is meant to address minor thumbstick issues such as inconsistent responses. It also states that normal wear related drift may not be solved by recalibration.
That makes browser testing useful before and after calibration because you can compare how the stick behaves.
How to Test a Gamepad Deadzone on PC
A modern browser can read connected gamepads through the Gamepad API.
MDN describes the API as a browser interface for reading gamepad buttons, axes, device information, and connection state.
For the cleanest comparison, keep your setup consistent.
Use the same browser, connection type, controller firmware, and software configuration between tests.
If Steam Input or another remapping tool is changing your controller output, that can change what a game receives.
Why Does My Controller Feel Different in the Tester and in a Game?
Because the tester and the game are not necessarily processing the same input in the same way.
The webpage reads values exposed by the browser.
The game may then apply its own:
deadzone
sensitivity
response curve
acceleration
outer threshold
aim settings
Steam Input can also remap or modify controller behavior before a game receives it. Valve’s own documentation points out that games commonly apply their own deadzones and that these settings can affect how controller input feels.
So if a stick looks clean in the browser but feels slow in one game, check the game’s settings first.
Does Deadzone Affect Aim and Controller Sensitivity?
Yes, especially close to the center.
A smaller center buffer allows tiny stick movement to reach the game sooner. That can help with micro adjustments in shooters, but it also makes unwanted input easier to notice.
A larger setting can make the center feel steadier, but very small thumb movements may do nothing until the stick crosses the threshold.
That is why players can disagree strongly about the “best” number. Their controller, game, aim style, sensitivity, and stick condition may all be different.
For a competitive FPS, you may care most about small right stick corrections.
For a racing game, smooth steering through the early part of stick travel may matter more.
For Rocket League, both steering and fast directional changes can make the center setting feel very different from a shooter.
Measure first, then tune for the game.
Controller Deadzone Troubleshooting
Controller Is Not Detected
Make sure the gamepad is connected to the computer and press a controller button.
Try a wired connection if Bluetooth is not working.
Check that the browser supports the Gamepad API and that another application is not interfering with the controller.
Stick Values Keep Moving
Take your hands completely off the controller and repeat the test.
If the movement is consistent in the same direction, compare it with another browser or game.
If it appears everywhere, the issue is more likely tied to the controller, its calibration, or system level processing.
One Stick Is Worse Than the Other
That can happen.
Each stick has its own physical parts and sensors. One can wear or lose calibration before the other.
Test them separately.
Stick Does Not Reach Full Range
Move the stick slowly around the complete outer edge.
If one direction repeatedly falls short, update the controller firmware if an official update is available and check calibration options.
Do not assume a center deadzone will fix an outer range problem. They measure different behavior.
Deadzone Is Different in Every Game
That is normal.
Games can add their own center filtering and response curves.
Steam’s developer documentation specifically warns that in game deadzones affect how joystick movement feels.
Bluetooth Results Look Unstable
Retest with USB before blaming the stick.
This gives you a second setup to compare.
If both connections show the same center behavior, the problem is less likely to be related only to the wireless link.
Should You Calibrate, Repair, or Replace Your Controller?
Start with testing.
If the center is only slightly off and your controller supports official recalibration, try that first.
Update the controller firmware where the manufacturer provides an official updater.
For Xbox Wireless Controllers, Microsoft provides calibration through Xbox Accessories and warns that wear related drift may remain after calibration.
For DualSense on Windows, Sony provides controller firmware updates through the PlayStation Accessories app.
If a small in game deadzone removes the issue without hurting control, you may not need a repair.
If the unwanted movement keeps getting worse or requires a large center buffer, hardware service or stick replacement may make more sense.
What This Controller Deadzone Tester Can and Cannot Measure
This tester can read the controller values exposed to the browser.
That can include axis position, button state, controller identity information, and mapping status through the Gamepad API.
It can use those values to estimate things such as center offset, idle movement, stick magnitude, range, and return behavior.
It cannot look inside the controller.
It cannot directly measure potentiometer wear, spring condition, contamination, solder joints, or the magnetic sensor itself.
It also cannot guarantee how a game will process the same physical movement because the game may apply additional input settings.
That distinction is important when diagnosing a controller.
How Our Deadzone Test Works
The tester reads analog axis values from your browser’s Gamepad API.
The W3C specification states that gamepad axes are normalized to values between -1 and 1. It also defines a standard layout that browsers can use when they recognize a compatible controller.
For a standard dual stick layout, horizontal and vertical values can be treated as X and Y coordinates.
Distance from center can then be estimated from those coordinates.
During an idle test, several readings are more useful than one snapshot because the stick may move slightly from sample to sample.
A range test checks how the reported values change as you move the stick toward its physical limits.
A return test checks whether the stick settles near the same center after being released from different directions.
The result should be treated as a browser based diagnostic, not a factory certification.
Controller Deadzone Test Methodology
For repeatable comparisons, use the same setup every time.
Keep the browser, operating system, connection type, controller firmware, Steam Input state, and any remapping software consistent.
Run the idle test without touching the controller.
Repeat center return tests from several directions.
Run a full range test slowly rather than flicking the stick around once.
If you change calibration or firmware, repeat the same test and compare the readings.
For troubleshooting, also test inside at least one game. This helps separate a controller level issue from a game specific input setting.
The browser measurement itself is based on the standardized Gamepad API rather than direct access to the electrical output of the joystick sensor.
Supported Controllers
The tester can work with many gamepads that the operating system and browser expose through the Gamepad API.
That commonly includes Xbox Wireless Controllers, Xbox Elite controllers, PS5 DualSense, DualSense Edge, DualShock 4, Nintendo compatible gamepads, GameSir controllers, 8BitDo models, Hall Effect controllers, TMR controllers, and generic USB gamepads.
Support can vary by controller, operating system, browser, connection method, and feature.
MDN specifically notes that Gamepad API feature support can differ across combinations of controllers and platforms.
FAQS
Is 5% Deadzone Good?
It can be, but the number alone does not tell you whether it is right for your setup.
If your stick stays stable well below that level, 5% may leave enough center buffer without feeling slow. If your stick drifts past it, you may need more.
Test the controller instead of treating 5% as a universal rule.
Is 10% Deadzone Too High?
Not necessarily, but you may notice more lost movement close to center.
If you need 10% only to stop serious drift, test the controller carefully because the hardware may be getting worse.
Can Deadzone Cause Input Lag?
A deadzone is not the same thing as transport or processing latency.
It ignores movement below a threshold.
That can feel like delayed response because the game does not react until you move the stick far enough, but the cause is different from actual input latency.
Does Deadzone Affect Aim Assist?
It can change how your stick movement interacts with a game’s aiming system because it changes when analog input begins.
Aim assist behavior itself is controlled by the game.
Do not assume that one setting will produce the same result across Call of Duty, Fortnite, Apex Legends, Overwatch, or other shooters.
Can Stick Drift Get Worse Over Time?
Yes, some hardware causes of drift can worsen with wear.
Potentiometer based sticks use physical contact surfaces that can change as they wear.
If you keep needing a larger center buffer every few months, test the stick again and compare the readings.
Does Controller Calibration Remove Deadzone?
No.
Calibration and deadzone are different.
Calibration helps software interpret where the stick’s center and range should be. A deadzone tells software how much movement around center to ignore.
Can I Test a Used Controller Before Keeping It?
Yes.
A browser test is useful for checking center behavior, range, buttons, and repeated return to center before deciding whether a used controller feels healthy.
Run the test more than once. A single clean reading does not tell you how the stick behaves after repeated movement.
Related Controller Testing Tools
After checking the sticks, use the main gamepad tester to verify buttons, triggers, D pad input, and controller detection.
If the center is moving on its own, run a dedicated stick drift test.
If a repair or replacement module has already been installed, run a Controller Calibration Tester before and after adjustment.
Vibration, button, PS5, and Xbox specific tools can then help isolate other controller problems.
Technical References
This page uses the W3C Gamepad specification and MDN Gamepad API documentation for browser axis values, controller mapping, connection behavior, and API limitations.
Steamworks documentation is used for game level deadzone behavior, joystick configuration, and anti deadzone concepts.
PlayStation documentation is used for current DualSense PC connection and firmware support.
Xbox documentation is used for official thumbstick recalibration guidance and its stated limits with wear related drift.
iFixit’s joystick engineering and repair references are used for the physical differences between potentiometer and Hall Effect sensing and for common wear related drift behavior.